Showing posts with label crafts. Show all posts

22 January 2013

Crystals


With temperatures yesterday topping out at a balmy 11°F (and that was at midnight, it just fell from there), we've been thinking about snow and ice.  We had tried making ice marbles once earlier this winter, but it didn't go well.  We got our water balloons food colored and set out and two of the four froze overnight, but by the time we went out to take the balloons off, it had warmed up to the mid 30s and they were back to water.  Then we had a warmish week or so where our nice big snowfall gradually melted off the lawn and the liquid water balloons looked at us reproachfully every time we went by in hoodies rather than parkas.  It did eventually get below freezing again, but with daytime temps hovering around freezing and bright sun, they didn't stick around very long.  So we decided to try again now that it is cold and will hopefully stay that way for a bit.  It went much better this time:

The blue one is tiny since it was the first one filled.  I took it off the faucet to see if it looked full enough.  Since there was plenty give left in the balloon, I tried to put more water in and promptly learned that it isn't a good idea to put a water balloon with food coloring in it back on the spigot.  Fortunately, it cleaned up pretty easily and I managed to evade the nickname "Smurfette."

Before we got in the kitchen to make our marbles, we had been watching Arthur on Netflix and saw an episode where Francine tried to make rock candy.  Miss Bean perked right up and wanted to try herself.  I Googled madly for a few minutes and determined that we didn't have all the supplies to get rock candy started last night, but while I was looking, I recalled an interesting project I had pinned on Pinterest a while back.  We did have everything we needed for borax crystal snowflakes so we started those instead.  We diddled with pipe cleaners, borax and boiling water and the next morning we woke up to these:


After they dried, we hung them in the front window so they can sparkle in the sun and sparkle, they do.  This was a quick, easy, and fun project.  We even read about crystals on the web for a while and saw how the smooth facets reflect the close-packed internal atomic structure.

So after we did our grocery shopping (and got some clothes pins), we were ready to make some rock candy.  We had planned on making four jars, so I did four times the quantities in the recipe we used, but it ended up with enough super-saturated sugar solution for six 12 oz. canning jars.
This one is going to take a lot more patience.  Most of the directions say 3-7 days for crystals to form, so we'll be checking them regularly.  Good thing we have lots of other fun stuff to keep us busy!

04 May 2009

Want some pot?

Oops. I mean pots. Pots. You know, for planting seeds. One of the conference session was making seed pots from used paper. We made four Dixie cup sized pots in the session, but only three made it home (one got kind of smooshed).

Aside for the tomato saga:
We planted tomato seeds in March to get ready for the garden. We used the store-bought peat pods and had them in the kitchen. They went from seeds to seedlings with two leaves about two inches tall quite rapidly, but then just stayed there. They were also pretty pale, so the problem seemed to be not enough light. So after we harvested seeds from our FastPlants last week, I immediately re-purposed the bottle-pots and light box for tomotoes. I decided to start from scratch rather than further abuse the spindly little seedling. By the time we got home from Oshkosh, many of the seeds had sprouted and are a bright, healthy-looking green, so they will need to be separated soon so we don't end up with one big mass of roots! So we need pots. Back to the actual blog entry...
So, as I said, we need pots. So last night I decided that we could make some more paper pots. The session leader did a brief explanation and then we got to observe parts of the process (not necessarily in order), so what follows is my take on making paper seed pots.

Last night I pulled some shredded paper from the recycle bin under the paper shredder and and covered it with water and left it to soak. The very elegant bucket is a repurposed empty kitty litter bucket.


This morning I started the pots. First, I drained the water off the (now mushy) shredded paper. Then I added some water to the blender container and added a lump of mushy paper shreds (it's a technical term...deal with it). I had to experiment a bit with how much water and how much mush. Too much of both and it slops up the sides and leaks out around the lid. Too much mush and the blades make an air bubble and whir around in nothing so you have to stop and start to get it smooth. I found I could get a bit more in the blender if I started at a slow speed and then jumped to faster speeds.


Blended pulp. Mmmm...yummy!


I poured it into a strainer and shook and tapped it to get as much water out as I could. I also squeezed a little more water out with my hands. If there is too much water it doesn't hold its shape and takes forever to dry. If I squeezed out too much water, it didn't want to mold nicely. So I left it fairly wet and squeezed more water out as I pressed it into the "mold." For the conference session, we used Dixie cups. Today I used yogurt containers rescued from the recycle bin. The bottom of a milk carton or jug would work, too, for bigger pots.


I just kept smooshing in more pulp like play dough until the inside was covered evenly. Then I smooshed out as much water as I could and put them out in the sun to dry. The Dixie cup ones from Saturday weren't completely dry, but they were dry enough to pop out of the cups and I think they will finish drying in the sun quickly. I'll leave the new ones until enough water has drained/evaporated so they aren't mushy and then pop them out of the cups to finish drying.


Here is one of the cups from Saturday. I think the last bit of dampness will be gone after being in the sun today and it will be ready for seeds or seedlings! Then when it's time to go out in the garden, the cup can just be planted directly into the soil, where it will degrade as the plant grows. For this reason, it's not a bad idea to think about how the donor paper has been treated. Newspaper made from post-consumer waste with soy ink is probably better than those shiny, multi-colored sale flyers and coupons, if ya know what I mean.

This has also gotten me thinking about trying out some paper-making with the kids. Yeah, I'm definitely an "ooo, shiny" kinda gal.

I'm also thinking that this will make a great dead-of-winter, no-sign-of-spring-in-sight project. We can start thinking about what seeds we'll want to plant and the resident artist can draw pictures on the pots so we'll remember what to plant where when the time comes.

The best part of the project is, for my cheapskate self, total project cost: $0

23 February 2009

Darwin Day

Sheesh! Can someone tell me what happened to February? I have been dithering from thing to thing, rarely finishing things before getting distracted by something else. Plus, a few days of deceptively spring-like weather has made us even squirrelier about enduring the snow and cold! So I have a couple of blog items to get caught up on. Here's the first.

For those of you not in the know, Charles Darwin's 200th birthday was the 12th of February (as was Abe Lincoln's...quite the auspicious day back in 1809!). As Kitty Daddy has been on a bit of a evolution kick lately (elbow deep in Stephen Jay Gould and we have been getting the videos from the PBS Evolution series out from the library), we were unnaturally excite about Darwin's birthday! First off, the weekend before, we went to a Darwin Day up at the University. They had tables set up with displays and activities for all ages. At some of the tables, we collected stamps on our tree of life leaflet to win a prize (a shark tooth fossil for each kid). One table that caught my eye was the Wisconsin Fast Plants. The guy who developed these bred them for a rapid life cycle, for use in educational settings. They can be used for activities at most any age level. For small fries, they can watch the life cycle unfold, learn about pollination, and harvest seeds. For bigger kids, they can change environmental factors and observe changes. For even bigger folks, there are different varieties of seeds available (fuzzy stem, purple stem, yellow-green leaves, taller species, etc.) so there can be experiments with breeding and genetics. We ordered some seeds and have been getting ready to grow some. I may or may not post some of our progress here, but for excruciating details, you can find them here.

For the actual day of Darwin's birthday, we made fossil cookies for Daddy. When I was growing up, I remember having made cookies with ceramic stamps, so I had my mom send a couple of the recipes that came with the cookie stamps and we used some of the kids' dinosaur toys to make our "fossils." Before baking:


and after:


08 January 2009

Catching Up II: Stealth Projects

While there wasn't a lot of Christmas knitting and crafting, there were a few projects. First up, crafting with the kids. For the grandparents, we made tote bags with freezer paper stencils. The kids make the drawings on freezer paper and I did the cutting and painting. The bags are:

Sammy dancing in a mushroom (Beeb is on top) by Bean for our local adopted grandma:

Cat sleeping by Bug for Kitty Daddy's mom:

Bug in an easy chair with mom in the wind by Bug for Kitty Daddy's dad:

Kitty Daddy and Bean by Bean for Kitty Mommy's parents:

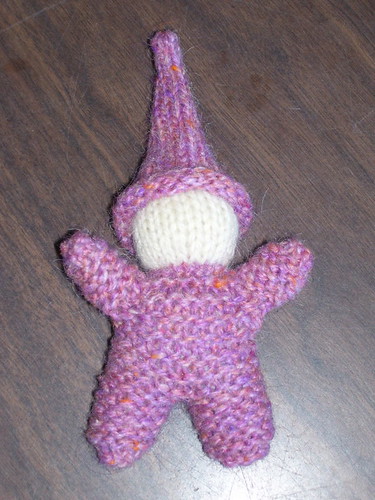
My bit of Christmas knitting was for my wee nieceling. She got a pair of Peace Fleece longies and a matching gnome baby with some of the leftover yarn:

100_1758

100_1760

Oh, and if you're interested, here are pictures of my baby brother being a dork with veggies. One of us was clearly switched at birth, as I am never goofy or odd. *snort*

25 March 2008

My artist boy

Bug had the markers out this morning and was drawing pictures of people and Easter bunnies and cats and all kinds of friendly folk, but this one just charmed me beyond words. It's a bat hanging upside down in his cave.

25 October 2007

Eeeewwwwww...spiders!

No, actually, there are nice and cute, cuddly spiders! Yet another Halloween-inspired crafts project. We made the spiders a couple of weeks ago and finished up the webs this morning. We got black pipe cleaners, black pom-poms, and google eyes from the craft store and added paper plates, black paint and black and white yarn from the home supplies.


Other than that we have been alternating between camping at home nursing colds (Beeb, Bean, and I) and trying to get out and enjoy the fall weather. In preparation for winter, we have added a Tuesday library trip to check out some of the other nearby South Central libraries. We like the familiarity of the branch we have been using, but it is a tiny library in a strip mall and the kids are getting a little bored with the limited kids area toys and I'm getting a little tired of having the teensy-weensy kids area cheek-by-jowl with the computers and feeling like we are disturbing everyone!

After the library, it was too beautiful to go back home, so we went looking for a park that we had heard good things about. I couldn't remember the name and only had a vague idea of where it was, but we hid pay dirt! We found Lake Farm park, which has wonderful hiking trails, three playgrounds scattered among the hiking, a lovely setting with trees, prairie, and Lake Waubesa. First, we alternated hiking and playgrounds and on the way back we alternated hiking and sitting on park benches overlooking the lake and reading library books. Since it was a spur of the moment trip, I didn't have my camera, but we definitely be going back, so I will get pictures sometime!